Adding Attributes
To add attributes to a class, you must first navigate to the class/entity to which you wish to add an attribute. In the tree view, expand the ‘Domain data model’ node, then select the class name for which you would like to add an attribute.
Next, from the main menu, select Edit | Add attribute, or from the toolbar click the ‘Add attribute’ button as highlighted by a red arrow in the screenshot below:
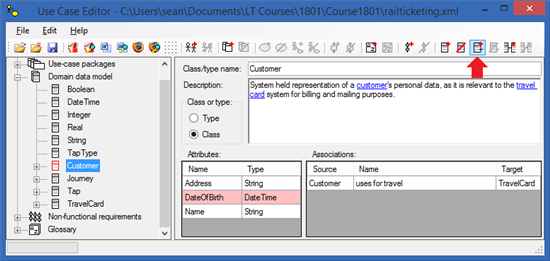
A new attribute will be added to the entity, and the editing panel for that new attribute selected on the right hand side.
Editing Attributes
Before editing an attribute, it must be selected using the tree view, or must be added as a new attribute to a class as described above. To select an existing attribute, expand the ‘Domain data model’ node in the tree view, then select the class the attribute to be edited belongs to. In the list of attributes at the bottom left of the class or type editing panel, click the attribute you wish to edit. The right hand panel will be replaced with the editing panel for the attribute, and the corresponding attribute will be selected in the tree view. The editing panel will appear as in the screenshot below:
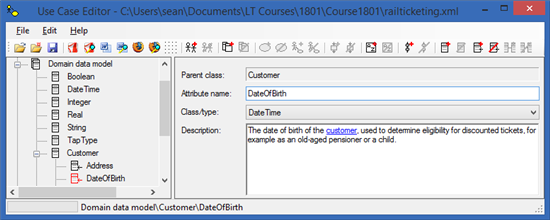
The attribute name, its class or type, and its description may now be edited. Note that the class or type is a drop down, only allowing you to select the basic type of the attribute to be selected from the list of existing types. If you wish to make an attribute have a new type, add that type and its description to the domain data model first. It will then appear as one of the entries in the class/type drop down in this panel.
Deleting Attributes
To delete an attribute, first navigate to it in the model as described above. Once the attribute is the selected node in the tree view, it can be deleted by selecting Edit | Delete attribute from the main menu, or by clicking the ‘Delete attribute’ button on the toolbar as shown in the screenshot below:
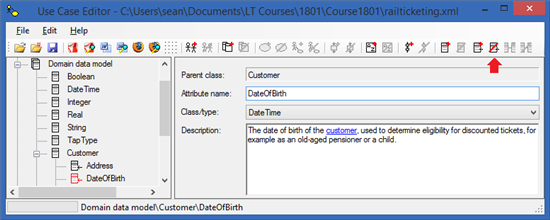
Once the attribute has been deleted, the use case editor selects the parent class/entity of the now defunct attribute, so that the editing panel on the right shows you the details for that parent class.
Adding Associations
To add an association between to classes, first navigate to one of the two classes involved in the association, by successively expanding and selecting nodes in the tree view.
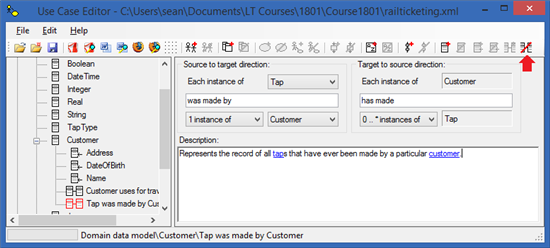
Once you have selected one of the two classes, select Edit | Add association from the main menu, or click the corresponding toolbar button as highlighted by a red arrow in the screenshot below. (Note that the button is greyed in the screenshot as the editing window has already added a new association here.) The association editing panel will be displayed in the right hand panel of the main window as shown:
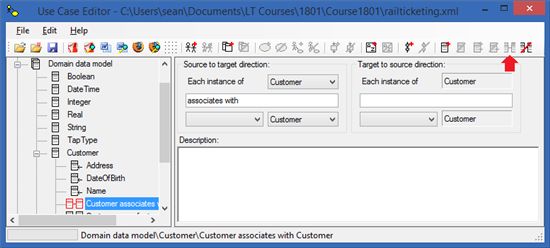
By default the added association is an association from the selected class back to itself. You will need to change the class in the ‘Source to target direction’ end to a different class if needed, at the left side of the editing panel. Select the different class from the drop down.
Now you must provide the association verb phrase in each direction along the association, choosing a verb phrase that must be true only when objects of the two classes concerned are connected by the relationship, and false when they are not. Choose also the multiplicity to reflect the minimum and maximum number of entities that can be involved in the relationship in each direction. For example, in the completed association description below, the source to target direction can be read as ‘Each instance of a Tap was made by exactly one instance of a Customer’, while in the reverse direction, the association reads as ‘Each instance of a Customer has made between zero and many instances of a Tap’.

Editing Associations
To select an existing association, expand the ‘Domain data model’ node in the tree view, then select one of the two classes the association to be edited belongs to. In the list of associations at the bottom right of the class or type editing panel, click the association you wish to edit. The right hand panel will be replaced with the editing panel for the association, and the corresponding association will be selected in the tree view.
You can now go ahead and edit the association as described above.
Deleting Associations
To delete an existing association, expand the ‘Domain data model’ node in the tree view, then select one of the two classes the association to be edited belongs to. In the list of associations at the bottom right of the class or type editing panel, click the association you wish to delete. The right hand panel will be replaced with the editing panel for the association, and the corresponding association will be selected in the tree view.
You can now go ahead and delete the association by selecting Edit | Delete association from the main menu, or by clicking the corresponding toolbar button as shown in the screen shot below. After deletion, one of the two classes that was involved in the association will become the selected node in the Use Case Editor.