Editing Detailed Steps
When producing detailed use case descriptions, rather than using informal descriptions of the sequences of interactions in paragraph form, it may be more useful to describe the sequences as lists of numbered steps. This has a number of advantages. First, it is easier to see the sequential nature of the use case paths. Second, since the steps are numbered, it is much easier to identify extension and remerge points, because they can now be referred to jst by their step number. Lastly, by describing a use case using the numbered step approach, the Use Case Editor is able to automatically generate activity diagrams showing a use case’s primary and alternative paths on a single diagram.
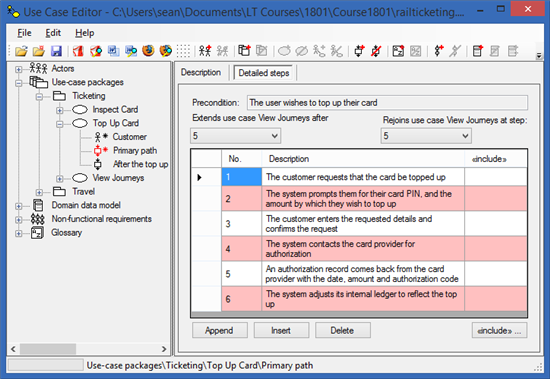
To edit the steps for a primary or alternative path, navigate to the path you wish to edit in the tree view at the left of the main window. Once there, click on the ‘Detailed steps’ tab at the top of the path editing panel at the right of the main window. A screen shot of this window for a path whose detailed steps have already been filled in is given below:
A description of how to use the controls on this panel now follows, assuming that you start with no steps in the grid at all. Initially you will not be able to use the Append, Insert or Delete buttons, as you need to specify the extension point and remerge point first.
In the ‘Extends use case <use case name> after’ drop down, select the step number in an existing path after which the alternative path branches and does its own alternative steps. If this is the primary path for a use case, this extension step is not needed.
In the ‘Rejoins use case <use case name> at step’ drop down, select the step at which your alternative path will resume execution in the primary path when the alternative path is over. Note that if your alternative path is also an alternative end to the use case, you should select ‘Ends use case’ from the drop down.
Having selected these two items, the three step editing buttons at the bottom of the panel will now be enabled so that you can start adding steps. The function of these buttons is described below.
Append button
This button always appends one new empty step at the bottom of the use case. It does not append after the currently selected step in the step grid.
Insert button
This button inserts an empty step above the currently selected step in the grid. Make sure you select a step in the grid first, so that the newly inserted step is put at the right point in the sequence. Note too that insertion of a step will update all the step numbering. This is automatically consistent, meaning that if a step number is changed while editing, all child paths together with their extension and remerge step numbers will be automatically updated too.
Delete button
This deletes the currently selected step in the grid. Deletion of a step will also update all the step numbering. This is automatically consistent, meaning that if a step number is changed while editing, all child paths together with their extension and remerge step numbers will be automatically updated too.
Note that the only field you need to edit in the grid is the description field. The step numbers are provided automatically by the tool.